Wednesday, August 31, 2011

Wooden Spoons & Rubber Spatulas

I believe that this subject has been mentioned in either the cookbook or on this blog but needs repeating.  When cooking, it is best to use wooden or rubber utensils instead of metal.  Part of the reasoning behind this is many of today's pots and pans have a coating on them to make the piece non-stick.  Metal utensils may damage or shorten the life of these pieces of equipment.
Wooden Utensils

The non-stick police are not going to come and drag you away for using metal utensils.  Using the metal utensils occasionally with a pot or pan is going to happen.  It's alright and I do use metal turners, at times, for flipping eggs, etc.

I do have and use the wooden utensils.  I recommend that you hand wash these tools instead of just throwing them in the dishwasher.  They will serve you much longer and better for doing this.

A set of rubber spatulas of various sizes and shapes is great for your kitchen.  Please make them all heat resistant ones.  That way you don't have to worry about which one to use for which function.  If these have wooden handles, then hand wash.  Otherwise, they are good to go in the dishwasher.
Heat Resistant Rubber Spatulas

Of course my favorite shopping places carry a variety these utensils.  So just check out Kohl'sFood Network and QVC-In the Kitchen with David.

The wooden utensils are now coming in bamboo.  I'd look at these because the bamboo is easily renewable and you will be helping the environment.  I'll be doing that once my present ones wear out.

Remember that this week both Thursday and Friday will offer a new recipe.  Have a great Labor Day weekend and for those of you in school, a great fall semester or quarter.

Tuesday, August 30, 2011

Another Tuesday Update

This week and next are very busy weeks for me.  I've mentioned that I'm on the board of Big Brothers Big Sisters Nodaway County.  This year I'm the chair of the Fund Raising Committee and we are having a raffle for a scooter that lasts until the end of September.  This week we start a big push for sales on the university campus as school begins.  Campus Activities at the university has asked me to do one of their "Late Night Thursday" programs on cooking.  So now I'm working on putting a program together for that function.  I'm also working on some cookbook promotions which includes some travel and, of course, writing this blog.

I am not complaining on all that is going on because I enjoy keeping busy.  It's just that everything seems to hit all at once.  I'm sure this sounds like your life too.  Just busy busy and then bam, you get hit with more.  I'm sure the new freshman are feeling that this week as they adjust to college life and classes.  Good luck with the new school year and enjoy your new experience.  College years in my opinion are the best years of your life.

The blog will be modified a little for these two weeks.  This week will have two (2) recipes with one on Thursday and then the usual one on Friday.  Cucumbers will be involved in both recipes.  I have been asked for the recipe I use for "Refrigerator Pickles" and a friend gave me a recipe for a "Cucumber Salad" which freezes well too.  Wednesday's blog is about wooden spoons & rubber spatulas.

Next week will have two (2) recipes too.  There will be an update on Tuesday and Wednesday will be on how to cut a fresh pineapple.  Then on Thursday and Friday we will have a new recipe each day.

Friday, August 26, 2011

Pulled Pork

Pulled Pork
(10 -12 sandwiches)


Ingredients:

4 lb. Boneless Pork Butt
1 recipe Dry Rub for BBQ (see note)
1 12 oz. bottle of your favorite beer

Directions:

Combine all the ingredients for the dry rub and mix very well.  Take the pork butt out of the package, rinse with cold water and pat dry with a paper towel.  Place the pork butt in a large pan and start applying the rub to all sides of the meat.  Pat it on with your hands using the entire rub mixture.  It may not all stay on the meat.  Now place the meat in a large zip-lock bag and place in a pan big enough to hold it.  Refrigerate the meat overnight.  Preheat the oven to 225 degrees while you remove the meat from the bag and place it on a rack in a 9x13 pan.  Pour the bottle of beer into the pan carefully not getting it on the meat.  Cover the pan with foil and place in the oven.  It will take about 6 hours to cook.  Use an instant read thermometer or better yet a remote thermometer.  You want the pork butt to reach an internal temperature of around 200 degrees.  Once you hit this temperature, remove and let rest for 30 minutes.  After resting, undercover and remove from pan (carefully) to another pan.  Take 2 forks, one in each hand, and pull the meat apart (shred).  Serve with your favorite BBQ sauce, pickle slices and bread or buns.

Note:               Dry Rub for BBQ is a recipe that is in the cookbook “More Than
                          Your First Cookbook.”  I’ll repeat the ingredients here; 2 tbsp.
                          of chili powder, smoked paprika and brown sugar, 1 tbsp. of
                          seasoned salt, garlic powder, onion powder, ground mustard,
                          ground cumin, celery salt and black pepper, 2 tsp. cayenne
                          pepper (optional).

Ideas for Future Efforts
___________________________________________________
___________________________________________________
___________________________________________________
___________________________________________________
___________________________________________________

Thursday, August 25, 2011

Mandolines

In the dictionary, a Mandolin is a flute-like musical instrument with four to six pairs of strings.  Well, we're not talking about that kind of mandolin.

We're talking about one that you use in the kitchen.  It is basically a manual slicer.  If you have a food processor, it will do many of the same things that can be achieved with a mandolin.  However, the food processor doesn't give you the exact same slice each time.  A mandolin can and will give you perfect slices each time if that is what you want and need.
Mandolin with 3 slicing attachments

I have had my mandolin for a bunch of years.  It is from Pampered Chef and my daughter Beth gave it to me as a gift. It works great for me and you will notice in the photo that it comes with three (3) different cutting attachments.  There are two (2) different types of slicing attachments and one (1) attachment that shreds items for you.  I will generally use the slicing attachment that is third from the right in the lower row.  I use this when I want thin consistent slices.  In fact, I just used it to make my favorite "Refrigerator Pickles" this week.

I know that you can get a mandolin slicer on QVC.  David Venable, who hosts "In the Kitchen with David," shows one every Sunday noon time and Wednesday night.  Or at least it seems that way because every time I watch his show, he has one on.  The main reason for that is they are easy to use, safe and easy to clean.  Check David out and see if you want or need a mandolin.

Now I'm sure my other two favorite shopping places, Kohl's and Food Network, have them too.  But since I'm not looking for one, I''ve never paid attention and can't say for sure.

If you don't have one, put it on your wish list and maybe you'll get one for Christmas or your birthday.

Remember, tomorrow's recipe is for "Pulled Pork" and it is done in the oven and not in a smoker/grill.

Wednesday, August 24, 2011

Question on Salt Substitutes

I have had a question on salt substitutes and want to address it today.  First, I'm not a doctor or even a registered dietitian so my thoughts are not gospel on the subject.  That being said, I have done some research on the subject and so here are my thoughts.

First, you need to check with your doctor to see if you need to be on a salt free or low sodium diet.  Salt substitutes are not for everyone.  In fact it can harm people's kidneys.  Salt contains Sodium Chloride and the salt substitutes contain Potassium Chloride.  It is the potassium that has an effect on the kidneys.  If you don't you still need to watch your salt intake.  Be smart in using salt in your cooking and especially its use at the table.

I have tried to cook without salt and only use it at the table.  After trying that I was not happy with the results.  Now I use it in my cooking and limit its use at the table.  This works much better for me, my taste and hopefully my health.  I use pepper in a much higher ratio to salt than normal recipes call for.  I do this by trying to lower the salt use and leave the pepper as stated in the recipe.  I like heat or spice so this may not work for you.

There are commercial salt substitutes on the market.  I'll just mention two of them here.  One is made by Morton and is called Salt Substitute.  Thee other one is called Also Salt and I believe it is only sold on the internet.  I'm sure there are others out there, you just need to look.

Another way to give yourself the taste or satisfaction of salt is to use herbs and seasonings.  I just recently talked about herb and spice grinders.  Well here is another reason to have one.  I have attached a link that gives several recipes for herb combinations to grind and use to replace the flavor of salt in your cooking and eating.

Gardenweb Herbs Salt Substitute

I hope this helps get you started on understanding and inquiring about salt substitutes.  Please remember to check with your doctor.

Tomorrow we talk Mandolins.  Friday's recipe is for Pulled Pork.

Tuesday, August 23, 2011

Tuesday Update

I'm not sure what happened but SUMMER IS OVER.  The K-12 schools have already had a partial week of school.  A week from today is the first day of classes at the university here in town.

I've been so busy, in retirement, getting the cookbook done and available for purchase, canning salsa and pickles, helping get a raffle going for a scooter to help Big Brothers Big Sisters of Nodaway County and blogging.  Summer just passed me by.

Comments and reviews on the cookbook have been coming in and people are quite pleased.  Me too.  I've even signed a few cookbooks already.  Speaking of that, anyone wanting their cookbook signed, just let me know and I'll be happy to do it.

I've also got some cookbooks coming to me.  So if someone needs an extra copy or forgot to order it on time for a particular event (like birthday), you can get one from me.  Just let me know.

Tomorrow I will try and cover salt and salt substitutes in regard to cooking.  Thursday I'll talk about another piece of equipment, the mandolin.  It is something that will make prep work a little easier.

The recipe this Friday is for Pulled Pork.  If you have been following this blog for long, you know I don't have a smoker.  This puller pork is done in the oven using a dry rub.  It comes out moist and falling apart.  Just thought with summer ending and Labor Day weekend coming quick, pulled pork sounded like a great way to start the school year.

Friday, August 19, 2011

Crab Cakes

Crab Cakes
(6 cakes)


Ingredients:

12 oz. Lump Crabmeat
¼ cup Mayonnaise
½ cup Italian Bread Crumbs
1 tbsp. Old Bay Seasoning
1 whole Egg
1 tsp. Fresh Lemon Juice
Canola Oil, as needed for frying

Directions:

Place drained crabmeat in a medium sized bowl and then add the next 5 ingredients (through the lemon juice).  Carefully combine the ingredients together using your hand or a mixing spoon.  Now divide into 6 portions and form into patties approximately 1 inch thick and 2 ½ inches in diameter.  Place on a plate and refrigerate while you heat the oil.  In a large skillet add enough oil to cover the bottom of the pan by about ¼ inch or slightly more.  Heat the oil over a medium to medium-high setting and add three cakes at a time.  Cook for about 3 minutes on each side.  Be careful putting the crab cakes into the pan, turning them and removing because they are delicate.  Repeat process with remaining 3 crab cakes and enjoy with your favorite sauce.  One of mine is below.  The crab cakes can be done in an oven at 400 degrees for 9 to 12 minutes.

Sauce:  In a small bowl combine ½ cup mayonnaise, 1 tsp. Old Bay Seasoning, 1/2 tsp. of your favorite hot sauce (depends on your heat factor) and 1 tsp. of fresh lemon juice.

Note:                  It takes 2 - 6 oz. cans for this recipe.  If you have access to
fresh crab meat, I'd get a pound so you can have a little snack after the crab cakes are made.

Ideas for Future Efforts
____________________________________________________
____________________________________________________
____________________________________________________
____________________________________________________
____________________________________________________

Thursday, August 18, 2011

Spice Grinder for your Kitchen

You know how I'm always telling you that my favorite places to shop are Kohl'sFood Network and QVC for the kitchen.  This week I received my Kohl's peel off promotion and had a 30% off one.  I've been waiting for this to happen because I wanted a spice grinder.  Well I bought this past weekend for just over 31% of the retail price because of their sale price and the extra 30% off.  Now that is saving on something you want or need.  I also had the money to pay for it and so there is no reoccurring interest.  That's what I call a GREAT deal.
New Spice Grinder

I've got some kitchen need ideas for Christmas with our 4 children.  I'm just waiting for QVC to have the right item at the right deal.

What's a spice grinder ?  What everyone uses is really a coffee grinder.  However, you don't want to use your coffee grinder to grind herbs and spices too.  It will give your coffee a very different taste because it is very hard to clean the grinder well enough to use for coffee again.  It is best to have two grinders if you grind your own coffee.  Just make sure you keep them straight as to their use.  If you don't want to use a grinder with your herbs and spices, there is always a mortar and pestle.  This just requires a little more elbow grease.

Why would I want one?  When you grind your own herbs and spices just before cooking, it adds so much more flavor to the food.  For herbs you want to use dried ones to grind into powder.  With spices it takes a little more work (but the results are worth it) as you need to toast the spices first.  To do this, take a large saute pan over medium heat and add the spices you want to grind.  Heat the spices in the pan for 2 to 3 minutes and then remove to a dish and let cool to room temperature before grinding.  Make sure that you have only a single layer of spices in the pan.  Also, don't over fill the grinder.  Do small batches when grinding.

Enjoy playing with your food and getting that great flavor when you grind your own herbs and spices.  Mom won't even yell at you for the playing but thank you for the meal.

Tomorrow is crab cakes for our recipe.  Enjoy them and have a great weekend.

Wednesday, August 17, 2011

Keep asking Questions

Today, I have another question to answer and a link to a great article on families eating meals together at home.

Let's start with the questions.  Several have asked what is the easiest way to seed tomatoes.  There are a fair number of recipes that ask for tomatoes without the seeds.

There are two basic shapes to tomatoes.  Most tomatoes are basically round.  The easiest way to remove the seeds from these in my opinion is to core the tomato after you have washed them.  Then slice them in half separating the top from the bottom of the tomato.  Now take each half, one at a time, in the palm of your hand with the cut side up.  Holding on to the tomato, turn your hand upside down with the cut side facing down over the sink or a bowl.  Squeeze the tomato sides together and the seeds should drop out of the tomato into the sink or bowl.  Rinse the inside of the tomato under running water and set aside.  Repeat the process until you have removed the seeds from all the tomatoes you needed for the recipe.

Roma tomatoes are more pear shaped and require a slightly different procedure.  Again wash the tomatoes and slice off the top about a half inch down.  Now slice the tomato in half from top to bottom.  Place the tomato half in your hand cut side up.  Turn your hand over and squeeze the sides together for the seeds to drop out.  You may need the assistance of a teaspoon to scrape loose the insides.  Do this over a sink or bowl and then rinse out the insides and set aside.  Repeat procedure with remaining tomatoes.

You can peel the tomatoes first if it is needed for a recipe.  To do that after washing and coring the tomatoes, cut a small X in the bottom of the tomato and place them in a pot of boiling water.  Remove from the boiling water after a minute to two and place in an ice bath.  An ice bath is just a sink or bowl of cold water with ice cubes in it.  Let the tomatoes sit in the bath for up to 5 minutes and the skin should come off quite easily.  Use a paring knife if needed to help pull the skin off.  Once you have done this continue with the procedure stated above for removing the seeds.

I have preached over the years that a family needs to make all the effort needed to plan as many meals as possible at home.  I truly believe that family meals help everyone involved.  I know from experience as well as observation that it is difficult because of everyone's chaotic schedule.  However, it is still very important to get as many meals together and so it takes a little planning.  Mix them up if needed and try to have at least one meal from each meal time during a week.

The TV show, Blue bloods, has a family tradition of Sunday dinner and shows how important it is to each family member.  This dinner is for 4 generations of the family.

Check out the link below to what I stated earlier is a great article on families sharing meals together at home.

http://www.sparkpeople.com/resource/nutrition_articles.asp?id=439

Tuesday, August 16, 2011

Cookbook has Arrived

My wife had ordered the cookbook the first day it became available.  Well it came yesterday right at 3 weeks from the date ordered.  She is thrilled but she is a little biased.

However, I have heard from many family and friends that they have received their cookbooks.  So far, all have been giving very positive responses to me on the cookbook.  Now I'm sure none of them are biased.  I mean family and friends are always straight with you.  Right?

So if you don't really fall into the family and friends category, let me know what you think of the cookbook.  Be sure to read at least some of it and make a few recipes before you respond, but please do respond.  We want to let everyone know this really is a good cookbook.  Then those who have not bought it will know it is worth their time and money.  Remember the link to buy it is at the top of the page.

Thank you for all your help in getting the word out about the cookbook.

On another subject, I had put out on my Facebook page this past week a goal of hitting 2,000 page views.  As of this moment, it looks like we will miss by a few.  The last total I saw was 1,983.  Those 17 views could still happen as it is just 4:00 PM as I write this blog. We still have around 12 hours before this blog comes out.  Please help spread the word on the Cabana Boy Cooks blog.  Thank you in advance.

This week I will try and answer a few more questions that have come to me.  Please keep the questions coming.

I see where Red Lobster is advertising their crab legs this month.  Well, I love crab and so this Friday's recipe will be my version of Crab Cakes and a sauce to go with them.  You can pan fry or bake these crab cakes.  Like anything else we eat, they taste better fried.  Enjoy them whichever way your diet lets you.  Have a great week ahead.

Friday, August 12, 2011

Cucumber Soup (Hot or Cold)

Cucumber Soup
(8 to 10 cups)


Ingredients:

6 tbsp. Butter, divided
2 Yellow Onions, chopped
3 Cucumbers (about 2 1/2 to 3 lb.), peeled, seeded and chopped
1 tsp. Salt
¼ tsp. White Pepper
1 qt. Chicken Broth
2 tbsp. Flour
2 Egg Yolks
1 cup Heavy Cream

Directions:

In a large sauté pan, melt 4 tbsp. butter over medium heat.  Now add the onion and cucumber to the pan and sauté for about 15 minutes.  Stir in the salt, pepper, chicken broth and cover with a lid.  Lower the heat to simmer and continue for about 15 minutes.  Using a regular blender or food processor puree the mixture and set aside.  In a large sauce pan over medium heat, melt the remaining 2 tbsp. of butter and add the flour.  Whisk the butter and flour together and continue cooking for 1 to 2 minutes before adding the pureed mixture.  Continue to whisk mixture until it thickens and is smooth.  Lightly beat the egg yolks in a small bowl and add a tbsp. or two of the pureed mixture to the egg yolks and blend.  Now pour the egg yolk mixture into the pureed mixture.  Reduce the heat to low and add the cream as you whisk.  Be sure not to let the mixture boil but heat for about 2 minutes longer before removing the pan from the heat source.  You can now serve the soup hot or cool it and serve it cold later.  I like it both ways but the choice is yours.

Note:               I will occasionally add a pinch of nutmeg or cinnamon to the
                           soup for a little different taste.

Ideas for Future Efforts
___________________________________________________
___________________________________________________
___________________________________________________
___________________________________________________
___________________________________________________

Thursday, August 11, 2011

More Questions (cont.)

Today we will talk about cucumbers and onions because they are both in the recipe tomorrow.  How do you go about peeling, seeding and chopping a cucumber?  What is the best way to chop or dice an onion?  There is more than one way to do both.  The best thing to do is what works best for you and your style in the kitchen.

Let's start with the cucumber.  The first thing you want to do is buy fresh good looking cucumbers and use them before they start to go bad.  Wash the cucumbers before you start to peel them.  You can use a knife to peel a cucumber but most people will waste too much of the product.  So it is best to use a vegetable peeler for the job. Now hold the cucumber in your off hand and the peeler in your dominant hand.  I'm a lefty so that is my dominant hand.  Place the peeler on the cucumber close to your own hand and stoke away from your hand towards the far end of the cucumber.  Slightly turn the cucumber in your hand and repeat the stoke.  Continue this all the way around the cucumber until all the skin has been removed on that half.  Turn the cucumber in your hand so that your hand is now holding the skinned half and repeat the process.  When the entire cucumber is done, place it on a cutting board and slice it length wise in half.  Take one half in your off hand and using a teaspoon or a melon baller, scrape the seeds out of the center and into the sink or a trash bowl.  Repeat the process with the other half and your cucumber is now peeled and seeded.

You can get a vegetable peeler and/or a melon baller at my favorite places to shop; Kohl'sFood Network and QVC.  If you have some time on Sunday or Wednesday, check out "In the Kitchen with David" on QVC.  It will give you some great ideas for your kitchen and dining.

Depending on what you use is for this cucumber is decides what to do next.  For salads, I will just slice across the cucumber making half-moon slices about 1/3 of an inch thick.  If it is a large half, I may slice it length wise first to make more bite size pieces.

For this soup recipe, I will actually slice it lengthwise into 2 or 3 pieces and then cut into more cube shaped pieces.  This is because I'm going to saute it first and then puree the cucumber.  You decide how you are going to use the cucumber and cut it to fit your need.

Now an onion is different and everyone has their favorite way of doing them.  I'll try and give you some examples as we go through it.

Again, you want to pick out fresh good looking onions.  Using your hands, just rub over the onion and discard any loose outer skin.  Don't worry about getting all of it because you will take care of that after you cut into the onion.

Slice the onion in half from the top to the bottom.  By top, I'm referring to the end that had the part that grow out of the ground removed.  The bottom is the root end.  Now peel away the remaining skin.  Some people will try and only remove the skin.  Others, not worried about any product waste, will remove the first layer of onion because it is easier.  You choose what works best for you.  Remember that working with onions will bring tears to your eyes.  It's a side effect and can be reduced by putting the onion in the refrigerator for an hour or two before cutting.  But remember to store the onions at room temperature by themselves in a dark place.

Once you have removed the skin, lay half the onion on a cutting board cut side down.  Using a chef or sudoku knife, slice the onion lengthwise from the top towards the root at a right angle to the cutting board.  Do not cut through the root end.  We use this to hold the onion together while we dice it.  Now turn the knife 90 degrees and starting at the top, slice at a right angle to the cutting board again making small pieces of onion with each slice.  When you get to the root, discard it.  Repeat the process with the other half.

Different recipes call for different sizes of onion.  Some ask for a fine dice or a large dice (chop).  The spacing you use between each slice you make helps determine this size.  For a fine dice, make the cuts very close together in each direction you cut.  The large dice or chop requires larger spacing each way.  Now there are times when I will cut both ends off and slice the onion in half and make two slices in each directions to give me  a large chop for soups.  Again, it is what works for you.

I know that trained chefs will also add a third cut in the process.  Between the first and second cuts I described above they will make horizontal cuts into the onion.  I have asked numerous chefs over the years to explain why they make this cut and what it really does for them.  None of them have ever answered with anything but "that's the way we were taught."  To me it is a waste of time because the onion is already layered to be a curtain thickness which works for any size dice or chop you make.  Add the step if you want but I don't.

I'm sorry today's blog is so long but it takes more than a few words to describe the two processes.  Tomorrow's recipe will use both as we make a cucumber soup.

Wednesday, August 10, 2011

More Questions Answered

Some people that are following this food blog have been contacting me with questions.  I have started answering them in the blog so that we try and help everyone.  This week, we're going to answer several questions in the blog today and in Thursday's.

The first one has to do with cooking oils.  The question was in regard to vegetable oil and canola oil but I'll try and go beyond that and include oils too.

This person asked if you can use canola oil in recipes that ask for vegetable oil.  The answer is "Yes" because canola oil is a vegetable oil.  In a store you may see different brands on the shelf that call themselves any of the following; vegetable oil, canola oil or corn oil.  All three are a vegetable oil and are mostly interchangeable.  However, when you see the word vegetable oil as the type of oil it means that it is a mixture of several different vegetable oils.  It is usually cheaper than straight vegetable oils like canola and corn.  Something to remember as you purchase a cooking oil is the oil's smoke point.  Each oil, and butter too, has a different smoke point and that has an effect on your cooking.

Butter has the lowest smoke point and if used with to high of a heat will burn and cause the food to taste burnt.  One of the oils with a very high smoke point is peanut oil.  It is very good for deep frying or use in a wok.  It also costs a lot more than, say, canola oil which has a high smoke point.

Olive oil can be used for cooking or in salad dressing.  But olive oil also has more flavor in it than other vegetable oils.  That is why it is good in salad dressings.  It also comes in several different forms.  There is just plain olive oil, virgin olive oil and extra virgin olive oil.  The first two are good for sauteing or frying but not really good for salads.  The extra virgin olive oil is best for salads because it has more flavor but can be used for sauteing.  I just wouldn't use it in anything calling for medium-high heat or greater.  It is not good for dishes  where you don't want the flavor of the EVOO to influence the taste.

Another thing you can do with butter and oils is combine them when you saute.  When you combine butter with canola oil, for example, it gives you the flavor of the butter but with a higher smoke point because of the oil.  I'll use this combination when I am sauteing fish, for example.

If I'm deep frying, I will use canola oil but prefer to use peanut oil or an animal fat. like lard.  Now the lard is not considered healthy and my dietitians discourage it, but it gives a flavor you can't get with vegetable oils.  You could also use Crisco, which is a solid vegetable shortening.

For me, I keep Butter, Extra Virgin Olive Oil, Canola Oil and Crisco in my kitchen.  They will cover all my cooking needs including bake goods.

I hope this has been helpful and answers more questions than it creates.

Tomorrow the questions have to do with dicing or chopping onions and working with cucumbers.  Both of these ingredients are required for Friday's recipe of Cucumber Soup.

Tuesday, August 9, 2011

The Cookbook

I'm going to assume that many of you are just like me, waiting for the cookbook to be delivered.  My wife ordered it within the hour of my finding out it was available through my publisher's website.  That was July 22 (Friday) and it did not come today, August 8 (Monday).  So we are somewhere between the two to three weeks that they stated.  Patience is a virtue we all need more in our lives.

I started a Twitter account yesterday.  It says @BarryBeacom is the account name.  I'm not sure what I will do with a twitter account but I'm learning technology that is new to me.  I've actually moved ahead of some of our children in this technology stuff.  And they used to tease me about not having a cell until 5 years ago.  I guess that when you go to do something, you might as well go "Whole Hog" or forget it.

Speaking of "Whole Hog", if you have never had the opportunity to go to a hog roast find one.  They are a unique and a great time.  It should be on your bucket list if you have started one.

I was just interrupted by my daughter.  She called to tell me that she received an e-mail telling her the cookbook she ordered has been shipped.  She ordered it the day after my wife.  I better check with my wife and see if she received an e-mail.  I'm going to guess that now that the shipping has started, the cookbook will  ship a little faster.  It always seems to take longer to get started and then you get into a rhythm.

Thanks to all of you that have ordered a cookbook, I sure hope you get it soon.  Please give me some feedback on it after you have had time to read it and try some of the recipes.

This week on the blog, I will be answering some questions from some of you.  The questions have to do with cooking oils, cucumbers and onions.  Then because of the questions on cucumbers and onions, the recipe this week is for a Cucumber Soup.  The soup is in season and can be served hot or cold.

Have a great week and try making something you have never made before for dinner.

Friday, August 5, 2011

Broccoli Souffle

Recipe:


Broccoli Soufflé
(8-servings)


Ingredients:

2 12 oz. bags Frozen Cut Broccoli
2 cups Milk
½ tsp. Nutmeg
4 tbsp. Butter
2 tbsp. Flour
½ tsp. White Pepper
8 Eggs, room temperature
1 tsp. Salt
As needed Butter for greasing the soufflé dish

Directions:

In a large sauce pan, place broccoli and cover with water.  Bring to a boil over medium-high heat and continue for 15 minutes.  While broccoli is cooking, separate the whites and yokes of the eight eggs.  Be sure to place the whites in a large bowl and set aside.  In a smaller bowl, slightly beat the yokes together and set aside.  Drain the water from the broccoli and place in a blender or food processor with the milk and nutmeg.  Puree the mixture (you may have to divide the ingredients to mix depending on size of your equipment).  In the large sauce pan, now melt the butter over medium heat.  When melted add the flour and incorporate for about one minute.  Then add the broccoli pureed mixture and whisk until it comes to a boil.  Remove from the heat, take ¼ cup of the mixture and add to the egg yokes.  Blend these together before adding to the large broccoli mixture.  Now set this aside and start on the egg whites.  Add the salt to the egg whites and using a hand or stand mixer, beat on high speed until you have stiff peaks.  Using a rubber spatula, fold in the egg whites to the broccoli mixture until well combined.  See notes below on folding technique.  Place the completed mixture into a buttered (sides and bottom) 2 quart soufflé dish.  In a pre-heated 350 degree oven, put the soufflé dish in a hot water bath and baked for 1 hour (give or take 5 minutes).  Time may vary because of individual ovens.  Soufflé should be puffed and slightly browned.  Serve immediately with the rest of the meal.

Note:               This recipe can be cut in half for a smaller crowd.

Note:               Try using a sauce with the soufflé, such as a hollandaise or a
                            cheddar cheese.

Note:               To fold something into something else is a relatively easy
                            process.  Just use a rubber spatula and make a circular motion
                            going from the top to the bottom of the mixture.  You are trying
                            to keep as much air (lightness) in the finished product as
                            possible.  It is not the end of the world if you happen to over
                            mix it.  It takes a little practice to be good at it.

Note:               You could try replacing the broccoli with another vegetable
                            like asparagus, cauliflower or carrot.  I have not to this point
                            but do plan on trying these vegetables.

Ideas for Future Efforts
___________________________________________________
___________________________________________________
___________________________________________________
___________________________________________________
___________________________________________________

Thursday, August 4, 2011

What's a Souffle Dish?

What's a souffle dish?  H___, what's a souffle?

A souffle is a baked food made light and puffy because of beaten egg whites folded into the food before it is baked.  You can have cheese souffles, a vegetable souffle and even dessert souffles with chocolate.  The cheese and chocolate just made a souffle more interesting to you.  Right?

The addition of a souffle to a meal brings it up a notch.  It gives it a more gourmet feeling to the event.  Souffles can be made in one large dish or be made as individual souffles.  The individual ones are really nice when they are a dessert.  Can't you just imagine an individual chocolate souffle.  It's your very own and you don't have to share it.  Life couldn't get any better.

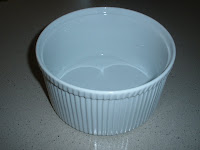
2 qt. Souffle Dish
Since a souffle is a delicate dish, not just any pot, pan or dish can be used to make one.  Typically, you need a dish with straight smooth walls on the inside.  They make dishes just for souffles.  It will range from 4 ounce ramekins to as big as 2 or 2 1/2 quart.

Of course my favorite shopping locations have a wide variety of this type of dish.  So be sure to check them out at Kohl'sFood Network and QVC.

This souffle dish works for more than just making souffles.  They are very good for most casseroles you make like baked macaroni and cheese or even baked beans.  The smaller ramekins can be used for individual puddings, crisps and au gratin dishes to name a few.  It's a good dish to add to your kitchen set up.

There are some great cheese and chocolate souffle recipes out there but I wanted to give you something a little different.  Tomorrow's recipe is for a "Broccoli Souffle."  I hope you will enjoy it, as it is one of my favorite souffles.

Wednesday, August 3, 2011

Separating Egg Yolks from whites

The first time you have a recipe that calls for just egg yokes or egg whites, you panic.  How do you separate the yoke from the whites?  Really it is a pretty simple operation, it just takes a little practice.

To start, you need to get two bowls.  One of them will be for the whites and the other for the yokes.  Get out however many eggs your recipe calls for and place on the counter by your bowls.  Taking one egg at a time, crack it on the counter.

Sidebar:  You always want to crack your egg on the counter (or flat surface) and NOT the side of a bowl.  Especially the bowl you are putting the egg into.  Using the side of a bowl will many times lead to pieces of egg shell getting into what you don't want it in.  It rarely happens when you use a flat surface.  Back to separating eggs.

Using your thumbs, separate the shell into two halves making sure the yoke stays in one half.  You need to be doing this above the bowl to be used for the egg whites.  Now slowly transfer the yoke from one half to the other half while letting the egg whites release from the yoke and into the bowl below.  You will never get all the whites to release and that is alright.  When you have as such white released as you believe possible, place the yoke in the other bowl and repeat the process with remaining eggs.

If you find that you don't like separating eggs by hand, you can buy a piece of equipment.  They do sell egg separators in many stores.  Try my favorites Kohl'sFood Network and QVC to find one, if you must.

If your recipe is calling for both the whites and yokes but separated, continue with your recipe.  If it only calls for one or the other, cover the part not needed and refrigerate up to a couple of days.  If you have not used them by then, please toss them out.  Remember that you can add them (either one) to scrambled eggs or omelets you make for another meal.

Now take the half you need for your recipe and continue with your cooking/baking.

Well was I right?  It is a fairly easy process that just needs a little practice to feel comfortable.  So get in there and separate some whites from the yokes.

Tuesday, August 2, 2011

Cookbook is Selling

Thank you to all of you that have already purchased one of the cookbooks.  I have had several people ask about whether they can get the cookbook now or do they have to wait until the release date of October 25th.  If you order a cookbook through the link I have placed near the top of this blog page, you will receive the cookbook within two to three weeks.

Please spread the word that the cookbook is available for purchase and give them my Cabana Boy Cooks link.  That way they will be able to follow the food blog as well as purchase the cookbook.  Thank you for your help in getting the word out.

I have had a few of my blog followers ask some questions.  So to try and help everyone, I'll answer them today. The first has to do with the wine ingredient in some recipes.  You don't need to buy a big bottle of wine if you usually don't drink wine.  It is best for you to purchase the 4-packs of wine that can be found in the wine section of most grocery stores (in states that allow wine sales in grocery stores).  If your state is one that doesn't allow these wine sales, try your favorite liquor store.  The 4-packs come in white and red wine choices and the bottles hold 187 ml of wine.  That is just over 3/4 (175 ml) of a cup.

The second question had to do with alcohol also.  For the recipes that call for some type of alcohol, buy the smallest bottle available unless you have other uses for that particular product.  Some liquor stores or departments offer the small bottles like you purchase on airlines when you are flying.  You just need to be resourceful.

Please keep the questions coming.

This week, we will talk about separating egg whites and yolks, souffles and the type of dish needed for them.  The Friday recipe is for a broccoli souffle.  Enjoy, and thank you for following the blog.